Raspberry Pi 7" Touch Screen Music/News Pad - Part 3
A computer for seniors.
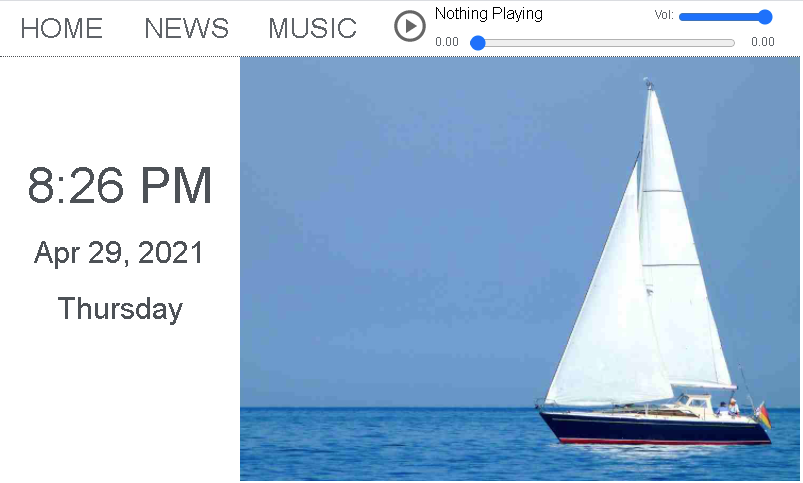
Let's take a look at the date & time function of this web app, built with Javascript. Here we go!
Date & Time
We need to write the HTML that'll display the datetime information. The datetime will populate three different div elements. Time, date and day. Crazy right...
<div id="time"></div>

<div id="date"></div>

<div id="day"></div>
Next, let's break up the datetime clock into its separate functions. First, we'll call our function myClock() so it appears upon loading, then use the setInterval() method to call our myClock() function every 1000 milliseconds which refreshes the clock element every second. If you want to include seconds in the clock, this would show the seconds portion refreshing every... you guessed it, second.
myClock();
var ClockVar = setInterval(
function () {
    myClock();
}, 1000);
The function we are building first creates a date object and stores it in the variable date. Then calls the methods getHours() and getMinutes() to store their information in the h and m variables.
After this, we need to change the 24 hour clock to a 12 hour system, and then say whether it is AM or PM. Use an if conditional to see if the hour is equal to 0, if so we will change the variable h to 12. Or if h is greater than 12 we subtract 12 - the current hour, and set the variable session to PM. Lastly, display the time elements in the time div.
function myClock() {
var date = new Date();
var h = date.getHours();
var m = date.getMinutes();
var session = "AM";

if (h == 0) {
    h = 12;
}

if (h > 12) {
    h = h - 12;
    session = "PM";
}

document.getElementById('time').innerHTML = h + ":" + m + " " + session;
Finally, since the getMonth() method will only return a number such as 1, 2, 3 or 12, representing the month, we need to setup an array to compare this number to. To do this, we setup an array with new Array(), and store it in our new array called month. Then, call the getMonth() method within the month array and store it in monthname - this results in the current month such as "Mar". After, call the getDate() and getFullYear() methods and store them in their variables before displaying the date in the date element. Afterwards, we'll pull the day and year into their respective day and year variables. Then display the date in the date div.
var month = new Array()
month[0] = "Jan";
month[1] = "Feb";
month[2] = "Mar";
month[3] = "Apr";
month[4] = "May";
month[5] = "Jun";
month[6] = "Jul";
month[7] = "Aug";
month[8] = "Sep";
month[9] = "Oct";
month[10] = "Nov";
month[11] = "Dec";

var monthname = month[date.getMonth()];
var day = date.getDate();
var year = date.getFullYear();
document.getElementById('date').innerHTML = monthname + " " + day + ", " + year;
For the day of the week, utilize the exact same approach to pull the name of the day. Setup a new array, and call the method within the array as its index, store it in the dayofweekname variable. After, display the day name in the day element.
var dayofweek = new Array()
dayofweek[0] = "Sunday";
dayofweek[1] = "Monday";
dayofweek[2] = "Tuesday";
dayofweek[3] = "Wednesday";
dayofweek[4] = "Thursday";
dayofweek[5] = "Friday";
dayofweek[6] = "Saturday";

var dayofweekname = dayofweek[date.getDay()];
document.getElementById('day').innerHTML = dayofweekname;
}
Picture Frame
The picture frame/slideshow feature is a combination of PHP to load the pictures and Javascript to cycle through them.
PHP - First, store your photos path in $path. Then, utilizing scandir and grep list all files/directories in your path, storing them in a new array called $files; this would return something like ['file.jpg','file2.jpg','file3.jpg']. Next, iterate over each item in your $files array, create a new filename without '.jpg' and make a count of the array. Lastly, print html for each image using the photolist class We'll use these later.
$path = "photos/";
    $files = array_values(preg_grep("/\.(jpg)$/", scandir($path)));
    $count = 0;
    foreach($files as $file){
    if ($file){
    $newfilename = substr($file, 0, strrpos($file, "."));
    $count = $count + 1;
    $arraynumber = $count - 1;
    echo '<img class="photolist" alt="" loading="lazy" data-src="https://yoursite/'. $path . $file .'" />';
    }
    };
Javascript - First, create an index for your slideshow and set it to 0. Then, build out our slideshow function called showSlides(). We will have to pull in all of the photo elements in the photolist class, storing them in the slides array. Then we'll find the length of the array, and iterate over each slide displaying it for 15 seconds. To show one slide at a time, we set all of the styles for these images to display = none so they are hidden until ready.
var slideIndex = 0;
showSlides();
function showSlides() {
var i;
var slides = document.getElementsByClassName("photolist");
var slideslength = slides.length;
    for (i = 0; i < slides.length; i++) {
        slides[i].style.display = "none";
        if (slideIndex == slideslength) {
            slideIndex = 0;
        }
        }
slideIndex++;
slides[slideIndex - 1].style.display = "";
setTimeout(showSlides, 15000);
}
In the next part of the series, we'll look at the news feed and music player!